ADC 207 is the first to use Flash Converting An Advanced High Speed VLSI 1.2 micron CMOS process. The process that is able to do the ADC 207 as mentioned earlier is very great and makes the ADC 207 is unique. The speed of the process of this ADC has a good linearity and have a stable temperature. ADC 207 has a lower power consumption is 250 mW. ADC is working with +5 VDC voltage source and at a frequency of 20 MHz. ADC 207 has a small sampling time is 12nS, thus making the ideal sampling results. ADC 207 has 128 features auto balanced comparators with each conversion that serves to offset temperature and dynamic effects that exist. Resistor ladder in the ADC 207 has a mid point that is connected to an external voltage source and function in the conversion of 7-bit linearity. ADC 207 has 3 levels of output that is easy to connect it with external components.
Battery Charger based on AVR ATMega 8535
Battery Charger in general can be interpreted as a means to recharge the battery charge. Principles of good charger circuit is capable of providing resources to perform effectively charging the battery, efficient and safe. AVR-Based Battery Charger ATMega 8535 With LCD Display This is an idea that had just emerged from the author. In AVR-Based Battery Charger design ATMega 8535 With LCD Display is using AVR microcontroller processor charger with ATMega 8535, process the data viewer charger with LCD, a safety from a hot temperature with the temperature sensor LM35 and several buttons for setting the charger. And component power charger Battery Charger Based on AVR ATMega 8535 With LCD Display is a FET.
IC LM2917 Frequency to Voltage Converter
IC LM2917 IC chip is designed specifically as a Frequency to Voltage Converter or Frequency to Voltage converter. In its use to applications Frequency to Voltage Converter IC LM2917 requires few external components. There are several examples of applications of Frequency to Voltage Converter IC LM2917 datasheet that is included in the LM2917 IC. In this article series Frequency to Voltage Converter IC also taken from the LM2917 datasheet. The advantages of single chip LM2917 Frequency to Voltage Converter is able to provide instantaneous volt output o at time of frequency change 0 Hz. Very easy to apply in measuring the output frequency with the formulation of single-chip Frequency to Voltage Converter VOUT = FIN x VCC x R1 x C1. Then the single-chip LM2917 Frequency to Voltage Converter This configuration requires only the RC only in frequency doubling. And has an internal zener regulator to aimlessly accuracy and stability in frequency-to-voltage conversion process.
Flip Flop LED
Flip flop circuit is a series of free runing multivibrator given the burden of LEDs on each side of the transition changes its output signal. Flip flop circuit with LEDs is quite simple, that is prepared with 2 units and 2 units of 2N3904 transistor circuit tank circuit composed by the RC circuit. LED indicators signal a change that is placed on each side of the flip flop will be lit in turn by the fire and extinguished the same as the charge and discharge capacitor. Flip flop circuit is quite simple as shown in the picture below.
AVR ATTiny To SMS Remote Controller
SMS Remote controller is a device used to control a device remotely using SMS through GSM mobile phones. Process control equipment with a series of AVR ATTiny To SMS Remote Controller can be used to control life and death of these equipment will provide information on the status of replies to our phone in return successful command execution. Yanga equipment can be controlled by a series of AVR ATTiny To SMS Remote Controller include lights, water pumps, garage doors, gates and much more. AVR series ATTiny To SMS Remote controller uses the module-47 Sony ericson GM as recipient and sender of the SMS module. Then to the SMS data processor on a series of AVR ATTiny To SMS Remote controller is using AVR microcontroller ATTiny 2313.
Real time controller AT89C2051
Real time controller is a device used to exercise control over household perankat continuously ongoing and scheduled. The series of Real Time Controllers with microcontroller AT89C2051 which dituls in this article is a tool that can do that serve targeted. The series of Real Time Controller with Microcontroller AT89C2051 Atmel AT89C2051 uses a data processor and controller sebgai pernagkat installed. In the application directly perngkat requires a separate interface from a wide range of Real Time Controllers with this AT89C2051 microcontroller. When will connect the device with the AC power source to use interface optocoupler (MOC) or solid state relay. Devices that can be connected with the series of Real Time Controller with Microcontroller AT89C2051 include lights, water machines, fans, electronic gate. The series of Real Time Controllers with this AT89C2051 microcontroller to control a height of water level, controlling the flame lights the scheduled SCARA and censored.
Easy Downloader Circuit
Atmel microcontroller series AT89Cxx51 Easy Downloader is one of the downloader that is often used to write data to program the Atmel microcontroller AT89CXX51. Easy Downloader AT89Cxx51 ATMEL microcontroller is using the serial port as a channel of communication with the computer. Easy Downloader ATMEL Microcontroller AT89Cxx51 can be used to program Atmel AT89CXX51 in parallel. Atmel microcontroller series AT89Cxx51 Easy Downloader is quite simple to make your own because the components necessary to membutanya not complex. Atmel microcontroller series AT89Cxx51 Easy Downloader do not support the serial programming microcontrollers ISP. In the article Easy Downloader ATMEL Microcontroller AT89Cxx51 only displays images Easy Downloader Microcontroller series from Atmel AT89Cxx51 mengulasnya only and are simple.
Zero Crossing Detector
Zero Crossing Detector circuit is basically an application of a comparator. In the article series Zero Crossing Detector with Op Amp is built using a comparator of an Op Amp IC741/351. The process of detection of this comparator is mngamati 0Volt input signal crossing point by making reference value at comparator 0Volt. The output of the Zero Crossing Detector circuit with Op Amp is wave-shaped box that mengiterprestasikan teteksi result of the crossroads of 0 volt input signal.
PWM DC Motor Driver
As the title "PWM DC Motor Driver with Forward / Reverse and Breaking" this series is a PWM DC motor controller that can control DC motors with clockwise rotation and counter-clockwise and is equipped with a braking system. In a series DC motor control PWM DC Motor Driver with Forward / Reverse and Breaking use this system for SASL PWM DC motor rotation speed. Power driver in a series DC motor PWM DC Motor Driver with Forward / Reverse and Breaking uses mosfet IRF150. Then, to control the direction of rotation of DC motor in the circuit of PWM DC Motor Driver with Forward / Reverse and Breaking uses relays. Then the braking system on a series of PWM DC Motor Driver with Forward / Reverse and Breaking is done by a resistor that is connected to the motor using relays.
7Segment Display 74LS247
The displayor using a 7 segment display in electronic device applications is drain port of a microcontroller or data that would point in the show, especially when the data would be displayed more than 1 digit. necessary path to control the resources of each 7 segment and the path to input data on the 7 segment. Series Display 7 Segment 4 Digit Multiplex is a way to save the port or microcontroller data path that will be displayed. Series Display 7 Segment 4 Digit Multiplex uses BCD to 7 segment decoder 74LS247 BCD to encode data from the data that will be displayed, then for each resource viewer 7 segment using the set of transistors as electronic switches. Current flowing in the viewer in a series of 7 segment Display 7 Segment 4 Digit Multiplex is in limiting use yag resistor in series pairs in each collector transistor.
NIMH battery charger
Series NIMH Battery Charger with IC LT4060 is a NIMH battery charger is powerful, effective and efficient. Featur owned by IC LT4060 is a specialization of a NIMH battery charger. NIMH Battery Charger with IC LT4060 can perform safely charging NIMH batteries because it comes with a battery temperature protection is in charge and the peak level detection system of the battery voltage is in charge. Battery temperature protection system from the excessive use of NTC temperature sensor. Series NIMH Battery Charger with IC LT4060 also features a charging indicator that will light up when charging and will die when the battery is full. IC 4060 used in this NIMH battery charger from Linear Technology is a production that is designed special for NIMH battery charger.
Fire Alarm LDR
Fire alarm can be made with a light sensor (LDR) as in the article with the title of Fire Alarm with this LDR sensor. Principles of fire detection Fire Alarm with LDR sensor is to detect the presence of smoke through the LDR. LDR in the series Fire Alarm does not stand alone in detecting a fire, but the LDR in the pair with the light shining on the LDR. Hence, in the detected smoke from the fire then the intensity of light received by the LDR LDR decreases and eventually trigger an alarm system on a series of Fire Alarm with this LDR sensor. Part 2 that in the series of Fire Alarm with Sensor LDR are some of the sensors, tone generator, audio power.
10 Minutes timer with 555
Applications of 555 timer IC is very diverse, one series of 10 Minute Timer with IC 555. 10 Minute Timer This circuit uses IC NE555 is set as a monostable multivibrator. The timing of the timer circuit 10 minutes with the IC 555 is governed by the configuration of C2, R4 and R5. The greater the value of C2 at 10-minute timer circuit with IC 555 timer is active then the time will stay longer. Total resistance value between R4 and R5 also determine the active circuit 10 minute timer with IC 555, where the greater the value the longer time was also active. The core active setting the timer on the set of C2 charging time for 10 minutes on the timer circuit with IC 555. So, with the value of C2 remain so with time on the circuit timing Timer 10 minutes by IC 555 can be set by changing the resistance value R 4 + R 5. Indicators of active timer at 10 minute timer circuit with IC 555 uses the LED D2 and D3 will light up only one course to identify the active timer and the timer has not been met.
Audio Peak Indicator
The existence of the peak indicator "Audio Peak Indicator" in an audio device is needed. Audio Peak indicator is a simple circuit to detect the peak level of audio signal. Audio Peak indicator circuit is built with duabuah transistor and LED indicator sebgai peak level detection of audio signals. The main function of a series of Audio Peak indicator is to determine the occurrence of the peak level of audio signal that is more than +4 dB, equivalent to 1.25 V rms. If the received audio signal Audio Peak Indicator more than +4 dB was the LEDs in series Peak Audio This indicator will light. Audio Peak indicator circuit is mounted on the output audio system.
TDA 7012T FM Radio Receiver
FM Radio Receiver IC TDA 7012T is very simple, but it has an FM radio receiver sensitivity and good selectivity. Single Chip FM Receifer cool name of IC TDA7012T 7012T TDA is to build an FM receiver requires a few additional components. Feature contained in FM receiver IC TDA 7012T is quite tempting to an FM receiver. Among features an FM receiver TDA 7012T is a low-voltage applications micro affability arrangement (MTS), Frequency Loked Loop (FLL) to 76 KHz range and selectivity of FM receiver with RC Filter. In an article by FM Radio Receiver IC TDA 7012T can be seen in the FM receiver circuit which can be made.
Voltage to frequency converter
Changing the voltage to frequency scale in the design of an electronic device is sometimes necessary. The series of articles voltage to frequency converter with the XR 4151 is one jawabanny. Voltage to Frequency converter circuit with the XR 4151 is the idea of time in college, when there are projects to create a tool to hatch chicken eggs. It will be my neighbor also write articles incubators chicken egg-based microcontroller AT89C2051 (tempoe doeloe). Maybe there are friends who still remember to this project. Back to the topic of voltage to frequency converter circuit with the XR 4151. IC XR 4151 is a major component of voltage to frequency converter (Voltage to Frequency Converter).
MCS51 AT89S51 microcontroller architecture
Microcontroller architecture we need to know if we will use this MCS51 microcontroller in a control MCS51 microcontroller-based electronic devices. AT89S51 microcontroller MCS51 architecture actually almost similar to the other MCS51. MCS51 Microcontroller AT89S51 is MCS51 family of microcontrollers with 40 pins. In this article MCS51 AT89S51 microcontroller architecture can be seen, although not all.
Audio Power Amplifier LM3886
Audio Power Amplifier LM3886
Audio Power Amplifier is an important part in the reproduction of sound in a sound system. Audio Power Amplifier LM 3886 with power IC Audio Power Amplifier is a highly capable and able to produce 68 Watts with power rata2 4Ohm load and capable of producing power 38 Watt with 8Ohm load. With good sound reproduction capabilities of 20Hz-20kHz is also included on this LM3886 Audio Power Amplifier. LM3886 Audio Power Amplifier is equipped with spike protection that will protect the output circuit from overvoltage, undervoltage, overloads, konrsleting power supply, thermal runawaydan peak temperature. Audio Power Amplifier LM3886 also features a noise reduction system which can keep the audio from the noise well.
Doubler Digital Frequency
Doubler Digital Frequencycircuit includes a simple and easy to understand. Digital Frequency Doubler circuit application contained in the system electronics such as audio-producing organ, or keyboard. The function of this series Digital Frequency Doubler for multiplying two input frequencies. The process of multiplying 2 on scales in an organ in principle is like this series Digital Frequency Doubler. Example of rising to a ringing tone DO RE then electronically technique in it is by multiplying the two frequency bands such as this series Digital Frequency Doubler.
Microcontroller Interface Engineering With ADC 0804
In ADC 0804 interface techniques with microcontrollers are pin-pin control must be controlled if we want to use the ADC with the microcontroller, there is value addition refferensi voltage to be supplied in 0804 ADC interface with a microcontroller, for example, we use the 0804 ADC (8 bit), if we give refferensi voltage 2.55 volts then we will get the increase of 1 bit to change 10 mVolt. Please note that the 0804 ADC pin on the leg that is form Vref Vref / 2, so to get a 10mV resolution is necessary for setting Vref / 2 equal to 1.275 V
Choose PIC or AVR ATMEGA
PIC or AVR ATMEGA ATMega8535 PIC16F87X
Microcontroller more and more, to choose to use the PIC 16F microcontroller or AVR family ATMEGA 8535 just need googling that here. System works sama2 work on both the base 8-bit PIC or AVR ATMEGA. PIC or AVR basically the same microcontroller that has an analog input facilities in accordance with what I need. Feature owned by PIC and AVR ATMEGA too much alike. From the PIC feature on the analog input also has AVR ATMEGA. Feature ADC also owned by PIC or AVR ATMEGA even between PIC and AVR ATMEGA is sama2 have ADC with many channels all (plus mantab all). From the feature control PWM PIC and AVR ATMEGA also have. Well bener2 added mantab world with the presence of PIC microcontroller or AVR ATMEGA this, first MCS51 family still AT89C5x or AT89S5x wrote that in use. After dipikir2 should also be detailed feature between PIC and AVR ATMEGA with details.
Digital Thermometer 0-100.0°Celsius
Digital Thermometer 0-100.0 ° C is a digital thermometer that operates in mode temperature measurement in Celsius (° C). Digital Thermometer 0-100.0 ° C in this article using the form data processing microcontroller AT89C4051. Temperature sensors used in Digital Thermometer 0-100.0 ° C. This temperature sensor LM35D. Digital Thermometer 0-100.0 ° C. It uses the temperature measurement data viewer in the form of 1 line LCD viewer. Digital Thermometer 0-100.0 ° C. It can display the temperature measurement data with a resolution of 0.1 ° C.
Applications for the Matrix Keypad MCS51 Hexadecimal
Hexadecimal keypad matrix can be created with a microcontroller by using the parallel port MCS51. Hexadecimal keypad matrix system is working by reading the data on tiab line through each column or vice versa depending on the program. To make enough Hexadecimal keypad matrix with 1 port MCS51 microcontroller. With 1 parallel port, the microcontroller can be made Matrix Keypad Hexadecimal 4 columns and 4 lines or so-disebud with 4 × 4 matrix keypad. Hexadecimal Keypad Matrix 4 × 4 is in pernacangannya will provide data Hexadecimal 0 - F.
Programming Learning MCS51
Learning Programming MCS51 becomes mandatory we learn if we want to use the MCS51. In the first part of this Learning Programming MCS51 we will learn together about the basic programming language MCS51 microcontroller. Where to program MCS51 outline there are 2 core parts of pemrogramanya language is "Words Work" and "Object". In the article Programming MCS51 this first part we will study first the "verb" is a command group Peng-copies of data, the command group arithmetic and logic command group.
Ultra Fast Battery Charger
Ultra Fast Battery Chager for Nickel-Cadmium battery cells [NiCad] which will be discussed in this article is Fast NiCad Battery Charger, called the Ultra Fast Charger Battery Charger NiCad because it can make filling fast NiCad Batteries Cell. A battery charger in Desai has a fast charging capabilities such as Ultra Fast Battery Chager for Nickel-Cadmium battery cells [NiCad] on this article shall be equipped with some ability to protect the battery and charger circuit itself.
Characteristic NiCad Battery Charger
The advantages of NiCad batteries are rechargeable and can be in physical shape with regular batteries so no need to modify its casing. In addition, if compared with NiCad Batteries ordinary batteries, nickel cadmium batteries, or better known as NiCad batteries, the resistance has on ordinary batteries (NiCad battery with a record of the condition is still good). NiCad batteries in the market today there are several options for its size, among other 700mAh NiCad battery or 1500 mAh.
Battery Charger Temperature Sensor circuit with LM35
Battery Charger Temperature Sensor circuit with LM35 used to monitor the battery temperature is in charge. Battery temperature sensor is needed because the battery temperature will rise at the time in charge. Battery temperature sensor LM35 temperature sensor has high accuracy in monitoring the battery temperature, it is because the temperature sensor LM35 is a temperature sensor that can convert temperature changes into voltage changes linearly.
Solar tracker With AT89S52
AT89S52 With solar tracker is a tool used to control the direction of the panel Solar Cell for always getting sunlight. AT89S52 With solar tracker uses a light sensor as a light detector. AT89S52 With solar tracker uses dc motors for Solar Cell panels menegendalikan direction. Broadly speaking AT89S52 With Solar tracker may be analogous as a tool to adjust the position of the exposure to the sun solar cell direction by Ensor sensing light and a DC motor which is controlled using a microcontroller AT89S52.
1500W High Power Amplifier
Circuit Power Amplifier has a power output of up to 1500W RMS, power amplifier circuit is often used to power sound systems needed to outdor. In a series of images can be seen the final power amplifier uses 10 sets of large power transistors for the ending. This power amplifier circuit using a transistor amplifier starting from the front, signal splitter, driver and power amplifier. Current consumption required is quite large power amplifier that is 15-20 A for this 1500W power amplifier circuit. Supply voltage needed by the power amplifier in order to work optimally is symmetrical 130VDC (130VDC ground-+130 VDC). 1500W amplifier circuit below is a picture series of mono, if you want to create a stereo it is necessary to make 2 copies of the circuit. For more details can be viewed directly image following a series 1500W power amplifier.
Stereo Amplifier with Tube
Stereo amplifier is very simple, consisting of 5 active components including the power supply it. Series Stereo Amplifier With Tube was prepared with 5 units trioda tube consisting of 1 unit tubes 5Y3 GT vacuum rectifier, 2 tube tube trioda 6SF5 GT high-mu tube 6k6 and 2 units which form the power beam amplifiers. Power consumption for the circuit with a tube stereo amplifier is not more than 45 Watt. Current consumption for the circuit with a tube stereo amplifier is around 3A. A complete range of stereo amplifiers with this tube can be seen from the following series of images.
LM35 temperature sensor
LM35 temperature sensor is an electronic component that functions to alter the temperature of physical quantities in the form of a magnitude electrical voltage. LM35 temperature sensor has a parameter that each increase of 1 º C increase by 10mV of output voltage with a maximum limit of the sensor output is 1.5 V at a temperature of 150 ° C. For example, the design use LM35 temperature sensor we set the adc output reaches full scale when the temperature of 100 ° C, so that when the temperature is 100 ° C. The transducer output voltage (10mV / ° C x 100 ° C) = 1V.
Physical form LM35 temperature sensor

Although the LM35 temperature sensor voltage can reach 30 volts but given kesensor is at 5 volts, so it can be used with single power supply with the provision that the LM35 only require a current of 60 μA this means that LM35 has the ability to produce heat (self-heating) of sensors that can cause a low reading error is less than 0.5 º C at a temperature of 25 º C.
The following are the characteristics of the LM35 temperature sensor.
It has a temperature sensitivity, with linear scale factor between voltage and temperature of 10 mVolt / º C, so it can be calibrated directly in Celsius.
Has the accuracy or the accuracy of the calibration is 0.5 º C at a temperature of 25 º C as shown in Figure 2.2.
It has a maximum range of operating temperatures between -55 º C to +150 º C.
Working on a voltage of 4 to 30 volts.
Having a low flow of less than 60 μA.
Having low self-heating (low-heating) that is less than 0.1 º C in still air.
It has a low output impedance is 0.1 W for 1 mA load.
Having not linear only about ± ¼ º C.
555 basic PWM controller
IC Timer 555 has a basic PWM controller with features pengendalianlebar 0 .. 100% pulse that is controlled using the R1, at the time of controlling the oscillator frequency relatively stabi so it may be used to build the Simple PWM controller. Frequency of Simple PWM controller 555 depending on the value of R1 and C1, values shown R1 and C1 will form the output with a frequency of 170 to 200 Hz. Diode-diode used in the Simple PWM controller With this 555 can use a 1N4148.

R2, R3 and C3 form a giver triger circuit beginning at the reset IC 555 for 2 seconds. If you want to use a series of Simple PWM controller 555 with the V + not +12 V, it does not matter to raise tilapia R2 where (V + * R2) / (R2 + R3) is about 2, because it limits the signal level reset is 0.5 .. 1V. If you do not do that, then signal the kickstart to get too close to the limit reset signal reception.
Q output of 555 on the Simple PWM controller circuit 555 is used for driver PWM pulse, so that the discharge pin is used for transistor output driver instead. This is an open collector output, and is used as an active signal is low, so it can work. D3 protects the output transistor of the load induction. You may replace any suitable transistors for Q1, BD140 is 1.5 amps.
C4 and C5 is the power decoupling capacitor for the IC 555 on the Simple PWM controller circuit 555, which produce relatively large level of push-pull output stage.
DC motor driver with H-Bridge IC L293D
IC H Bridge DC motor driver L298 has two H-Bridge circuit in it, so it can be used to download the drive two DC motors. H Bridge DC motor driver L298 each can deliver currents up to 2A. However, in use, the H Bridge DC motor driver L298 can be used in parallel, so the ability to deliver the H Bridge DC motor driver L298 flow into 4A. The consequences of the installation of H Bridge L298 DC motor driver with the parallel mode, you need 2 pieces Bridge H L298 DC motor driver to control two DC motors using H bridge DC motor driver L298 in parallel mode.
H Bridge Pin IC L298 DC motor driver which is connected in parallel operation mode:
* OUT1 connected to OUT4.
* OUT2 OUT3 linked.
* IN1 is connected to IN4.
* IN2 connected to IN3.
* ENABLE ENABLE A linked to B.

OUT1/OUT4 and OUT2/OUT3 associated with DC motors to be controlled.
Please note that the output of the L298 does not have a safety diode. Thus, the need to add two diodes - flyback diodes, with appropriate current capability, at any point output.
4-Digit Digital Stopwatch
Stop Watch Digital in this article are manufactured using a source clock of timer IC 555 and to process the timing performance using the IC 74C926. IC 74C926 is a 4-digit counter with output latches are installed internally to the output viewer 7 segment and for the output driver NPN transistor to control the viewer 7 segment common cathode. penampilanan engineering data by the IC 74C926 done multiplexing to 4 pieces a viewer in control 7 segment through NPN transistor. The beating of the Stop Watch Digital built using a 555 timer IC dseting has output that can be set to tap the Stop Watch Digital is to count time 0.1 seconds and 1 second.
Digital Stop Watch

Work System Stop Watch Digital
First time series Digital Stop Watch will be used to do reset the Stop Watch Digital by pressing the S3 (Reset switch) so layaf will display data 0000. Then to start doing the counting is done by pressing the S2 (button start / stop) and to stop the Stop Watch Digital counting process is done by pressing the S2 (button start / stop) on the Stop Watch Digital. Then to choose the time of counting on a series Digital Stop Watch is provided by 2 votes counting time 0.1 seconds and 1 second to choose from dengang S1 in the Stop Watch Digital.
Basic Theory IC 555
Theory Timer 555
Timer 555 is a timer IC that works based on the RC circuit and the comparator is coupled with a digital component (R-Sflip-flop). The first 555 of the type manufactured by Signetics SE-555 working at -55 ° C to 125 ° C and the NE-555 working at 0 ° C-70 ° C. Then 555 is produced with different designs include the LM555, 556 (dual version), and LMC-555 (CMOS version). Timer 555 operates at +5 V dc power supply sd +18 V with temperature stability of 50ppm / ° C (0.005% / ° C). Output 555 can be a current sink / source up to 200mA. IC 555 is compatible with the components of TTL, CMOS op-amps, transistors and other types of linear ICs.

Timer 555 can operate either as a monostable or astable. The resulting square wave output can have a variation of duty cycle ranging from 50 - 99.9% and the frequency of less than 0.1 Hz up to more than 100KHz. 555 Series consists of two voltage comparators (COMP1 and COMP2), a control flip-flop RS (reset / set) that can be reset from outside via the pin 4, an inverting amplifier output (A1), and a discharge transistor (Q1). Kompartor second bias level determined by voltage divider resistors (Ra, Rb, and Rc) contained between Vcc and ground. Inverting input 2/3Vcc komparator1 given input and noninverting input from the given input komparator2 1/3Vcc. Monostable operation requires the input pulse triggers the PIN2 of IC 555. Input trigger voltage drop of more than +2 / 3Vcc toward the voltage is less than + Vcc / 3.
Monostable operation Timer 555
Monostable multivibrator (MMV), also called a one shot, producing a pulse output with a certain period when triggered by a pulse input. Output from Oneshot will instantly go 'high' following the trigger pulse (trigger) and will remain 'high' in accordance with its period. When the period had expired, the output will return 'low'. Outpt Oneshot will remain 'low' until there is another trigger. IC 555 can be operated as MMV by adding an appropriate external circuit.
Both internal comparator prasikap given voltage with a certain voltage level by voltage divider arranged series (Ra, Rb, Rc). Inverting input voltage up to 2/3Vcc komparator1 given, and the noninverting input voltage komparator2 given Vcc / 3. Tersebutlah voltage operation resulted in 555 both as a monostable or astable. External timing circuit (R1C1) connected between Vcc and noninverting input komparator1 through pin6. Pin7 also been linked with causing terhubungnya pin6 transistor to the capacitor C1. When the transistor is 'on', the resistance of the capacitor is so low that connect (short) through the relationship of CE transistor.
When 555 is connected to the source voltage, input voltage inverting komparator1 will receive registration 2/3Vcc and noninverting input voltage komparator2 would have amounted to Vcc / 3. This causes the RS flip-flop in a reset condition, so that its output Qnot 'high'. Therefore flip-flop connected to the output through an inverting amplifier pin3 (A1) then the output 555 'low'. In these conditions the capacitor charge (charging). Qnot in the 'high' cause transistor Q1 saturated, which means is connected to ground through a capacitor C1. So in this condition the capacitor to remove the charge (discharge) so that Vc = 0.
If PIN2 give trigger input, when pulsatrigger move towards less than 1/3Vcc voltage as shown in the picture, the noninverting input is more positive than the input komparator2 invertingnya, so that the output komparator2 be 'high'. At that time, FIP-flop in the set, so that the output Qnot her 'low' and keuaran 555 'high'. Because of its low Qnot output, means of transistors in the 'off'. Current flows from Vcc to ground through a capacitor C1. In other words, the capacitor re-charging. (Picture). Capacitor voltage will continue to rise until it reaches 2/3Vcc, at which time the output Vc = 2/3Vcc komparator1 be 'high' and cause the flip-flop is reset and the output 555 back to 'low'. The output 555 will remain until there is another trigger input.
All IC timers rely on an external capacitor to determine the interval of time off-on pulse output. The capacitor would require a certain time to charge or discharge through a resistor. Time can be explained and calculated from the resistance and capacity are given. Equation pulse period to 555 depending on the time required by the capacitor at the time of filling until it reaches 2/3Vcc voltage provided by the RC time constant. Thus, if the capacitor voltage e = E (1 - (-t/RC)), can be calculated time will enable the comparator threshold.
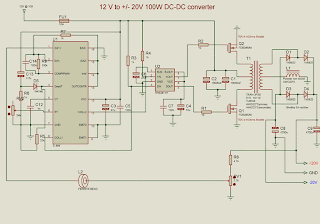
+12V to +/-20V DC converter
DC To DC Converter circuit used to be an alter tegngan voltage DC to DC with different concepts. DC to DC converter circuit +12 V to + /-20V is working to change the battery voltage from 12V DC to 20V DC voltage symmetrical. DC to DC converter circuit is often applied to the power amplifier udio on car audio systems. DC to DC converter circuit uses a TL494 IC as power plsa for the converter. TL494 IC is a PWM controller with an adjustable frequency from 40-60Hz through a potentiometer. Then from the TL494 PWM signal is given to the driver MOSFET inverter TPS2811P to be given to the power inverter with 2 units of MOSFET transistors. Circuit details can be seen in the figure following the DC to DC converter.
DC To DC converter circuit +12 V To + / - 20V
List Components DC To DC Converter +12 V To + / - 20V
R1, R2 = 10
R3, R4, R6, R7 = 1k
R5 = 22k
R8 = 4.7k
R9 = 100k
C1, C2 = 10000uF
C3, C6 = 47 u
C4 = 10U
C5, C7, C14 = 100n
C8, C9 = 4700u
C12 = 1N
C13 = 2.2u
U1 = TL494
U2 = TPS2811P
Q1, Q2 = FDB045AN
D1-D4 = 1N5822
D5 = 1N4148
FU1 = 10A
L1 = 10U
L2 = ferrite BEAD
RV1 = 2.2k
RV2 = 24k
T1 = TRAN-3P3S
DC To DC converter circuit +12 V To + / - 20V is capable of supplying up to 100W and can power supplying currents up to 3A. In making DC To DC Converter +12 V To + / - 20V has to be careful and cautious because there are parts of DC To DC Converter +12 V To + / - 20V in the form of an AC circuit.
DC To DC converter circuit +12 V To + / - 20V

List Components DC To DC Converter +12 V To + / - 20V
R1, R2 = 10
R3, R4, R6, R7 = 1k
R5 = 22k
R8 = 4.7k
R9 = 100k
C1, C2 = 10000uF
C3, C6 = 47 u
C4 = 10U
C5, C7, C14 = 100n
C8, C9 = 4700u
C12 = 1N
C13 = 2.2u
U1 = TL494
U2 = TPS2811P
Q1, Q2 = FDB045AN
D1-D4 = 1N5822
D5 = 1N4148
FU1 = 10A
L1 = 10U
L2 = ferrite BEAD
RV1 = 2.2k
RV2 = 24k
T1 = TRAN-3P3S
DC To DC converter circuit +12 V To + / - 20V is capable of supplying up to 100W and can power supplying currents up to 3A. In making DC To DC Converter +12 V To + / - 20V has to be careful and cautious because there are parts of DC To DC Converter +12 V To + / - 20V in the form of an AC circuit.
Digital basic logic gates
Digital basic logic gates, or often also called Boelan logic gates is a digital logic gate will output a logic 0 and 1 corresponds to the input received from each gate depends on the function logic. In the digital basic logic, there are 3 basic logic gates, ie AND gates, OR gates, NOT gates. Third this gate produces 4 next digital logic gates, namely: NAND gates, NOR gates, XOR gates, gate XAND.
AND Logic Gate
AND logic gate has the output formula AB = C, ie when both its inputs are not all the logic 1 output will be logic 0 and when both input logic 1 then the new output is logic 1.
OR Logic Gate
OR logic gate having an output summing function can be formulated A + B = C ie if one input is logic 1 then the output will be logic 1 and when both input logic 0 then the new output will be logic 0.
NOT logic gate
NOT logic gate or often also called inverting logic gates. NOT gate will output a value opposite of the input.
Drive Stepper Motor with IC UCN5804
IC IC UCN5804 is designed specifically for the purpose of stepper motor drivers. Stepper motor driver IC UCN5804 with this very simple and uses only 2 additional components as current-limiting resistors which flows into the stepper motor, it also can be removed so that the stepper motor driver is a pure IC UCN5804 only use only. UCN5804 IC can be used for stepper motor driver with 5-20VDC voltage. Source voltage required for a series of stepper motor driver IC dengn this UCN5804 follow steppernya motor voltage. Picture a series of stepper motor driver ICs with UCN5804 in detail can be seen in the following figure.
Drive Stepper Motor circuit UCN5804

In the series of stepper motor drivers with IC UCN5804 above to run a DC motor takes 2 inputs ie, the input signal and the input logic stepper direction of rotation. The input signal is a pulse stepper with a certain frequency where the frequency of these pulses that determines the speed of stepper motor puter. Then the input logic is a stepper motor rotating direction input logic 0 and 1 that is given to the IC UCN5804 to adjust the stepper motor rotating direction.
Interface LCD SED 1200 and Mikorokontroler AT89C2051
Microcontroller AT89C2051 is a 20 pin version of the microcontroller AT89C51. Technical interface to microcontroller AT89C51 AT89C2051 and can be prepared very simply. SED 1200 LCD can be used to display 20 letters / numbers very good, quite adequate for displaying telephone numbers and other short message message. As the LCD display in general, SED1200 consists of two parts, namely the LCD panel which consist of many 'points' LCD and a microcontroller attached to the panel and serves to set 'the dots' LCD'd be the letters / numbers that read, as well as functions for communication between the LCD display with another microcontroller using the LCD display. Task LCD display microcontroller users only send ASCII codes to be displayed.
In the data sheet says SED1200 LCD display is compatible with 4-bit microprocessor and 8 bits, this is due to SED1200 only equipped with 4 channels of data (DB0 .. db3) is used to distribute the ASCII code or command to set its SED1200. In terms of ASCII codes and commands are all 8-bit codes, the codes were sent twice, which first shipped is 4 bits are weighted higher (most significant bit - D4 .. D7) and then the remaining 4 bits (D0. . D3). In addition to DB0 .. db3, SED1200 also equipped with CS, WR and A0 such as components that are compatible with the microprocessor, which is somewhat distorted signal CLK lajut which will be discussed further below.
A0 is used to distinguish data that is sent to the SED1200, if A0 = 0 data sent is a command to control the SED1200 and vice versa if A0 = 1 data sent is ASCII code you want to display.
The process of sending data to the SED1200 depicted in Figure 1 can be described as follows:
CS signal is used to activate the process of sending this data, during this process CS activated by voltage level '0 '.
The data will be sent to the SED1200 prepared at DB0 .. db3, as discussed above codes are sent to the SED1200 split into 2 time delivery, this is seen clearly in Figure 1 which describes the delivery of D4 .. D7 .. D0 and subsequent delivery D3.
After the data is ready, WR signal is used as a signal of 'commando' for the SED1200 to retrieve the data on DB0 .. db3. Data collection is exactly what happened at the time of WR changed from '0 'to '1'
Interface to AT89C2051
AT89C51 AT89C2051 is a simplified into a microcontroller which only the legs of 20, a simplification that resulted AT89C2051 not have the legs DB0 .. DB7, P2.0 .. P27, WR, RD and ALE and how many other feet, other than that the instruction MOVX @ DPTR, A can not be used, thus the circuit of Figure 2 at all can not be used for the AT89C2051, and instead made the circuit of Figure 3, in this series and WR DB0 .. db3 replaced with Port 1 and its function is simulated through the program.
SED1200 CLK foot foot connected with P1.7 AT89C2051, SED1200 pulses required to process the received data generated by the program, it is not necessary to provide a special circuit to generate clock.
Cuts Program 2 is a sub-routine to control the SED1200 are connected to the AT89C2051 as shown in Figure 3, before taking the second sub-routine, the data to be sent to the SED1200 had to be prepared in the accumulator A.
Differences sub-routine and KirimASCII KirimPerintah lies in the value A0 at the time of the sub-routine work. Sub-routine KirimPerintah work with A0 = '0 '(line 7), AT89C2051 received data sent as a command to set the SED1200 SED1200 work. Sub-routine KirimASCII work with A0 = '1 '(line 11), received the data sent AT89C2051 SED1200 as ASCII code to be displayed
Throughout the process activated by the CS data transmission voltage level '0 'is done in line 13 and in his re-nonaktip on line 19.
Data in the accumulator A is sent byte-by-half-byte half twice, first sent A4 .. A7 (lines 15 and 16) then sent A0 .. A3 (lines 17 and 18).
Given AT89C2051 no ALE signal instead row 22 to be raised 16 to 25 clock pulses required by the CLK SED1200. 16 pulse is generated after A.0 .. A.3 sent to the SED1200, out of the sub-routine is SED1200 is ready to receive data again.
Line 29 to 36 Discount Program 2 simulates line 21 Discount Program 1, in line 29 feet WR SED1200 in zero out, lines 30 to 35 send to DB0 A0 .. A3 .. db3 (P1.0 .. P1.3) without changing the other signals are already in Port 1. In line 36 WR returned to '1 ', then that information on DB0 .. db3 taken by SED1200.
FM Signal Tracker
FM Tracker 1.5 Volt [Tracking Transmitter] uses the source voltage of 1-cell battery and 3.7 mA current consumption. FM tracer was prepared using the LM3909 IC and some supporting components. 1.5V FM trackers This will give an indication of revenue sources by providing signals emitted by the LED. When finished assembling FM tracking this 1.5V, then the next step is setting the working frequency of this FM tracker, for the sake of convenience we can use the help of an FM receiver and adjust the working frequency FM Tracer 1.5V (tracking transmitter) denagan how to set C3. Where has acquired an FM frequency trackers 1.5V (tracking transmitter) then the LED will light according to information transmitted by the transmitter as terdengan sound through the FM receiver. FM Tracer 1.5V (tracking transmitter) can use regular 12-inch antenna. Playing and learning electronics that mengasikan, 1.5V FM Tracking (tracking transmitter) is a good project to learn electronics.
Circuit FM Tracker 1.5 V [Tracking transmitter]
| FM Signal Tracker |
Series Description 1.5 Volt Tracking FM [Tracking Transmitter]
For stability, use a NPO types for C2 & C4.
Tolerance for R1 must be 1 or 2%.
Common frequency range is 87-109Mhz FM.
Email wire used in wire coil is made of 'hookup' 22 ga, such as solid Bell phone wire.
Ultraviolet Sensor (Fire Sensor) UV Tron
Ultraviolet Sensor (Fire Sensor) UV Tron is a flame sensor which is often used to detect the presence of sources of ignition under ultraviolet wave emitted by the fire. UV Sensor UV Tron can be applied with a microcontroller, such as ultraviolet UV Tron sensor is used for detecting the source of the fire on the robot in a firefighting robot contest. Tron UV ultraviolet sensor accuracy is very high against the existence of sources of fire, so it is suitable for the purpose of fire fighting robot contest that a small fire source in the form of wax.

Ultraviolet Waves:
Ultraviolet (UV is often abbreviated, of the English language: ultraviolet) are electromagnetic waves with wavelengths shorter than visible light regions, but longer than X-rays are small. UV radiation can be divided into near UV (wavelengths: 380-200 nm) and vacuum UV (200-10 nm). When considering the influence of UV radiation on human health and the environment, the wavelength range is often divided again to UVA (380-315 nm), which is also called the "wave length" or "BlackLight"; UVB (315-280 nm), also called " Medium Wave "(Medium Wave) and UVC (280-10 nm), also called" Short Wave "(Short Wave). Ultraviolet term means "beyond violet" (from the Latin ultra, "beyond"), while the word purple is the color of the shortest wavelength of light from visible light. Some animals, including birds, reptiles, and insects such as bees can see until you reach "nearly UV." Many fruits, flowers and seeds more clearly visible in the background in the UV wavelengths compared with human color vision.
UV Ultraviolet Sensor Module Tron (sensor Fire)
Speaker Protector Circuit with DC Protection
Speaker protector function to protect the speakers from damage caused by spikes in the audio signal when first turned on and the DC signal from the audio signal clipping. circuit protectors speakers consist of 2 parts which can protect the speakers are part of the DC signal detection and the delay. Part detetor DC signal composed by 4 pieces arranged diode bridge and a transistor. Then agian delay on the speaker is using a tank circuit protector in the form of capacitors, where the circuit composed of R6, C3, TR2 and TR3. End part of the speaker is using a relay protector. circuit protectors speakers in detail can be seen in the following figure.
Safety Speaker circuit

 |
| Component Speaker Protector Protection |
Automatic Water Pump Controller
Automatic water pump controller is a series of functions to control the water pump otamatis in a reservoir or water storage. As the water level sensor made with a metal plate mounted on the reservoir or water tank, with a sensor in the short to create the top level and a detection sensor for detecting long again made the lower level and ground lines connected to the bottom of reservoirs or reservoir. The series of automatic water pump controller is designed with 2 inputs NOR by 4 pieces and relay that is activated by the transistor. Automatic water pump circuit requires +12 VDC voltage source and can be used to control the water pump is connected to AC power jalringan. Here is the complete series of pictures.
Series Automatic Water Pump Controller

Sign Component Automatic Water Pump Controller
R1 = 15K
R2 = 15K
R3 = 10K
R4 = 1K
D1 = LED
D2 = 1N4148
Q1 = BC337
IC1 = 4001
SW = SPDT Switches
Relay RL1 = 12V
The working principle series of automatic water pump controller above is. At the time the water level is below both sensors, the output IC1C (pin 10) will be LOW, Kemudin when the water began to touch the lower level sensor, the output IC1C (pin10) remains LOW until the water touches the sensor level above, then the output IC1C (pin 10) going HIGH and active relay through Q1 and turn on the water pump to meguras reservoir. At the muli down and water level sensors for water untouched MKA IC1C output (pin 10) remains HIGH until the new water untouched semuasensor IC1C output (pin 10) LOW and water pump died. The series of automatic water pump controller is equipped with SW1 which serves to reverse the logic of drains (the output of IC1C) and the concept of water supplied (output dri IC1D). When SW1 is connected to IC1D the water pump will turn on when the water does not touch all the sensors and will die when all the sensors tesentuh water. Automatic water pump controller can be used to fill or drain the water according to which mode is selected via SW1.
Tube amplifier with power 25 Watt
Tube Power Amplifier 35W Push Pull is made using a tube and eventually compiled configuration push-pull amplifier. Tube Power Amplifier 35W Push Pull tube til it using EL-34 as the amplifier end.
Power supply with Z2C
Power supply with Z2C tubes are designed specifically to provide power supply voltage to the EL-34 tube amplifier push-pull in the previous article. Power supply with Z2C tube to tube power amplifier is made with a tube rectifier Z2C. Just as the power supply for power amplifier tube earlier, power supply also uses a filter 3 levels with kapsitor electrolyte. Circuit power supply with tube rectifier Z2C can give +210 VDC output voltage. A complete range of power supply for power amplifier tube can be seen in thethe following figure .

Z2C on the rectifier tube in power supply with tube above require a supply voltage for the filaments taken from the other side of the transformer secondary. Power supply with Z2C tube is a power supply that dapt used as a substitute power supply for power amplifier tubes with a diode in previous articles.
Power Supply EL-34
Power supply for EL-34 tube is specially designed for the purposes of power supply at the push-pull amplifier with EL-34 tube as in article 35 Watt Tube Power Amplifier Push Pull before. Power supply for EL-34 tube amplifier is made with transformers CT and 2 pieces diode as rectifier. Mechanical filters are applied in the power supply uses 3 levels. Power supply for tube power amplifier can deliver output voltages +220 VDC. Circuit details can be seen in the following figure.

The above power supply circuit has a high output voltage so that need to be considered in the manufacture and perakitanya because electricity can tesengat (stun). Power Supply For Tube Power Amplifier With Diode EL-34 was created specifically for the power amplifier tube push pull EL-34.
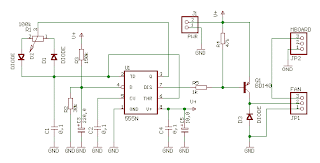
FET Touch Switch
The series of touch this switch be an Sklar sentu made using FET. This circuit serves to activate electronic devices only when we touch touch sensors. Once we release a touch to the sensor, the electronic device that is connected is turned off again. The series of touch switch or touch switch is very simple, composed only of a FET, resistor and capacitor. The series of touch switches / touch switches work with source voltage 12VDC. Detailed series of touch switches / touch switch can be seen in thethe following figure .
FET Touch Switch

The series of touch switches / touch switch can only be used to illuminate DC, 12V DC lamp when it replaced the relay, the circuit can be used safely to load the AC network. Sensor touch to this series was made with 2 pieces of plate are arranged close together (within 1-2mm).
NE555 Touch Switch
The series of touch switch or touch switch is built by IC NE555, a series of touch switches can be used to turn on lights, alarms or other electronic equipment. This circuit uses 2 pieces of metal plate media as touch, MP1 (Metal Plate 1) and MP2 (Metal Plate 2). Touch switch circuit is equipped with a visual LED indicator for relay status (load active). To enable (Relay ON) can be done by touching the surface of MP1 and to turn it off by touching the surface of the MP2. MP1 and MP2 in touch this switch can use a small piece of copper (diameter 5mm) was enough.
Touch Switch series with NE555.

Component List 555 touch Switch
R1 = 3.3M
R2 = 3.3M
R3 = 10K
R4 = 1K
C1 = 10nF-63V
D1 = 1N4007
D2 = Red LED
Q1 = BC547
IC1 = NE555
RL1 = 12V Relay
Interface Relay with PNP transistor
One technique relay drivers from the microcontroller or computer can be made with the driver PNP transistors like the article "Interface Relays With PNP Transistor" ini.This circuit interface is simple and easily applied to a microcontroller or computer parallel port. Interface Relays With PNP Transistor uses 2 transistors 2N3904 and 2n2905/2N2907 UAH as a power relay drivers. The advantages of this circuit can menggeran relay with considerable power with TTL logic input from the computer and microcontroller. Source voltage required to follow the relay circuit is used, for example using a 12V relay, the source voltage to 12V or 24V relays the 24V voltage source. Detailed relay interface circuit and microcontroller or computer can be seen in the following figure.

Function diodes mounted parallel with the relay to prevent backflow into the transistor due to magnetic induction of the relay coil, therefore these diodes must be installed. For installation with a microcontroller or computer which need to be noticed is the Grund computer or microcontroller circuit must be connected to ground in series Interface Relays With this PNP transistors.
Switch With Relay Schematic
Light Switch With Relay is a series of electronic switches that are controlled by a series of light received. Light Switch With Relay circuit can be used to control lighting automatically, so the lights can automatically turn on when the room light or the region began to decrease. Limit of light used to activate the electronic switch in the circuit Light Relay Switch With This can be set via the potentiometer P1. P1 setting is basically a light reception sensitivity settings. Light Switch With Relay circuit uses the LDR as the light sensor and an IC 741 as a comparator and reference voltage sensor, relay driver transistor Q1 as as an electronic switch. A complete range of Light Switch With Relay is as follows.

Circuit Light Relay Switch With diats a light switch that will be active when the sensor does not receive light, if you want to turn the tables (the active switch when the sensor receives light) it can be done by reversing the position between the LDR and R1. Diodan D1 serves to avoid the effects of EMF or sparking of the relay coil. The circuit is simple and easy to make, I hope to provide ideas and descriptions in the manufacture of a controlled light switch. Hopefully useful.
Color Sensor with TSC230
Color Sensor TCS230 color sensor is a chip that works with the converting acceptance of a certain color of light emitted into the shape of frequency. TCS230 Color Sensor composed dri two main parts, namely a light-receiving section arranged in an array photodioda and Chaya koncerter this part to the frequency. Basically the TCS230 Color Sensor is a light sensor which is equipped with light filters for RGB primary color (Red-Green-Blue) and light sensor without the filter with scale 8 bits for each of this part of the sensor.
 |
| TSC230 Color Sensor |
 |
| Pin Diagram |
Photodiode the TCS230 Color Sensor arrays arranged in 8 × 8 with the internal configuration of the photodiode. 16 photodiode for the light sensor with a red light filter. 16 photodiode for the light sensor with a green light filter. 16 photodiode for the light sensor with a blue light filter. And 16 photodiode for light sensor without a color filter. On the use of Color Sensor TCS230 we can choose the color sensor with a filter of what we want to set the configuration data S2 and S3.
Photodiode the TCS230 Color Sensor will issue a magnitude comparable with current levels of primary color of light that happened to him. This current is then converted into pulses with a frequency proportional to the amount of current. TCS230 Color Sensor Output frequency can be made by adjusting the scale of the configuration data S0 and S1 of the selector pins S0 and S1 Color Sensor TCS230.
Low Cost Digital Volume Control Amplifier
TDA8551 Mini Digital Volume Control Amplifier

Amplifier with digital volume control can we create a predictably simple because the article Mini BTL Amplifier with Digital Volume Control This series is made only with 1 IC TDA8551. The series of Mini BTL Amplifier with Digital Volume Control is a power amplifier with BTL type 1Watt. Techniques for adjusting the volume in this series has been provided with a pin point control that is controlled by providing an input voltage VCC and GND. The series of Mini BTL Amplifier with Digital Volume Control selector also features mute, standby and operating.
The series of Mini BTL Amplifier with Digital Volume Control is quite simple and small enough to make an amplifier for room or to headphones. Hopefully useful and can provide ideas for making digital amplifier with volume control.
Egg incubator comtrol list Program
List Program Temperature Controller AT89C2051 egg incubator is a program used to control the temperature control device incubator Egg With AT89C2051 which details a series of articles exist on Temperature Controller With AT89C2051. Many requests are asking for the program lists a series Temperature Controller AT89C2051 egg incubators. Hopefully with the upload list of programs from a series Temperature Controller AT89C2051 egg incubators can help and give inspiration to all who are looking teman2 reference to the construction of the Temperature Controller egg incubators. Temperature Controller program listings AT89C2051 Egg incubators that I uploaded are still many shortcomings, so it can be developed more to get better. Following the program listings.
Variable Speed DC Motor Controller 12V
For more details can be seen from a series of Variable Speed DC Motor Controller 12V follows.

Series Variable Speed DC Motor Controller 12V This is one series that can be used to regulate speed DC12V motor with PWM technique. Series Variable Speed DC Motor Controller 12V uses a 555 timer IC as a PWM pulse generator to regulate the motor speed DC12 Volt. DC motor speed control process performed by adjusting the potentiometer R1 lever which in principle is set High and Low pulse width of the PWM pulse.
Series Variable Speed DC Motor Controller 12V above the power MOSFET drivers in the form of a IRFZ46N is directly associated with DC motors. Working voltage of this circuit can be adjusted according to needs-driven DC motor, this circuit can work from 3-18VDC.
IC555 Tester Circuit
Complete circuit tester 555 as follows.

555 timer tester is a simple circuit that serves to test the condition of IC 555. 555 timer circuit tester, in principle, start the timer 555 in astable multivibrator mode. As an indicator of the status of the timer 555 good condition or damaged to use 2 pieces LED which will light up in a blink alternately when the timer 555 in good condition. And only one will turn on or off all the timer 555 when the condition is broken. 555 timer circuit tester is powered using 9 Volt DC voltage source.
How to use 555 timer tester is in conjuction with IC 555 to test the existing IC socket according to the order button. Then activate the power switch to begin testing the 555 timer ic. Then live we observe the LED indicators 2buah before, whether flashing alternately (good) or not blink or even die all (timer 555 damaged).
Switching Power Supply 90Watt
Switching Power Supply in the article is able to supply power 90 Watt. Series Switching Power Supply is built directly from an AC network system using special IC power supply switching MC33374 is a High Voltage Power Switching Regulator and with components external to the other. IC MC33374 is an IC power supply switching that is designed to operate with an AC voltage source and works as a power switching converter with flyback technique. Series Switching Power Supply has a 15 volt DC output with current up to 6 Ampere.

Series 90 Watt Switching Power Supply works by menyearahkan AC source is then used to activate the system converter MC33374 . The output of transformer switching converter MC33374 searahkan again later on as a DC voltage supply to be used for electronic devices.
Rain Detector Using 555
Rain Detector Using 555 is a simple alarm that can be used to find out it was raining. In principle, Rain Detector Using 555 is an astable multivibrator which is prepared by IC555 with installed a sensor that can detect water. Astable multivibrator with the 555 is set in the audio frequency with a frequency of 1 KHz. The series of Using Rain Detector 555 can be disupplay with a voltage source that is free enough from 5-15 VDC. In the application circuit Rain Detector Using this 555 can be mounted motor, car or other object that we want to protect from rain.

Water sensors that are used in circuit 555 Rain Detector Using this we can make yourself degan a PCB that we make the path as shown in the image above or as disclosed from the image above is by using aluminum foil taped to a board or boards that are plastic insulator . The important principle of the sensor is to conduct electrical current very well when the surface is exposed to water even a little. Hopefully useful ...
UPS Power Supply
UPS Power Supply For in this article is the power supply that is often applied in the system electronics which adopted the principle of the UPS . By adopting the principle of the UPS , the circuit power supply is still able to work even though there is no AC voltage source. For UPS Power Supply circuit consists of lowering the voltage, rectifier, charger , batery and regulators . The technique is applied from UPS on the power supply is the use of batery and charger is connected dengang direct coupling with a series diode. For more details can be seen with the following image.

The rectifier in series UPS Power Supply For this to function also as a charger via D1. D3 function is to drain-source voltage of the rectifier to the series regulator when there is an AC voltage source. D2 serves to drain the batery when the source voltage from AC voltage source does not exist. batery configuration and diode D1, D2 and D3 is adopted from the UPS system . may be useful and can provide inspiration on all in making backups on the system power supply voltage.
Sine Wave To TTL Converter
Sine Wave To TTL Converter is a series that we can use to change the sine wave signal with a pulse shape with the same frequency with TTL logic level that we are ready to use in coding the data digitally . The series of Sine Wave To TTL Converter can be used to convert sine wave signal to form a TTL of frequency 100KHz to 80MHz at the level of 100mV - 2V. The series of Sine Wave To TTL Converter uses a 5VDC voltage source. The series of Sine Wave To TTL Converter was built from transistor T1 gets base bias from R3, R4 and R5. If the series Sine Wave Converter This TTL To get the input sine signal with a minimum level of 100mV, the circuit Sine Wave To TTL Converter This will generate an output signal with TTL level square wave.

The series of Sine Wave To TTL Converter has input + impedance - 50 Ohm which is set using the R6. To change the value of the input impedance converter circuit Sine Wave To this TTL can be set via the R6 with a maximum value of 300 ohms.
Audio Frequency Generator Circuit
Audio Frequency Generator or often known by AFG is a device electronics used to generate signals with audio frequency range. Audio Frequency Generator (AFG) in the market there are many variant, from the analog to the digital . Even the assembly also exists, in principle, AFG is the frequency generator with an audio range. Here is one set of Audio Frequency Generator (AFG) which can be a reference if you want to make a series of Audio Frequency Generator (AFG) . The series of Audio Frequency Generator (AFG) is to use IC L8038 as a signal generator it.
 |
| AFG |
The series of Audio Frequency Generator (AFG) above has three output waveform that is, sine, square and triangle directly from the IC L8038. IC CD4066 and IC circuit Cd4017 a configuration circuit for waveform selector that can be set by pressing SW1. To adjust the working frequency is set by potentiometer R2.
Triangular Wave Generators
Triangular Wave Generators or Generating Triangle Waves in this article consists of 2 main parts. The main part is a series of non-inverting Schmitt triger by integrator circuit A1 and built by A2. Output Non-inverting circuit Schmitt triger on the Triangular Wave Generators or Generating Triangle Waves is a wave of box used for the driver integrator A2. Integrator is given a square wave input will output a triangle wave and used for feedback (feedback to a series of non-inverting Schmitt triger circuit A1 in Triangular Wave Generators or Generating Triangle Waves is thus a series of non-inverting Schmitt triger A1 will provide input into integrator repeated again and this continues.

The working principle circuit Triangular Wave Generators or Generating Triangle Waves at the first time is when the non-inverting Schmitt triger A1 gets first supply will provide logic high or low. When output is non-inverting Schmitt triger A1 A2 logic low, the integrator will output a high ramp wave, while the output at non-inverting Schmitt triger high A1 integrator output ramp down form of waves. Where A2 is the output integrator circuit input Non-inverting Schmitt triger A1 so that the incident will be repeated and the triangular wave generator running.
Emergency Light 555
Emergency Lamp With 555 is one solution for lighting during power outages. With Emergency Lamp Series 555 uses a 12VDC voltage source that can be supplied from the 12V battery. Emergency Lamp 555 Series With these very simple and easy to make because all the components easily available in the market. Emergency Lamp Series With this 555 can turn on the light 5W-10W. The circuit is built with an astable multivibrator with the IC 555 that is used to mendrive transformer through Q1. For more details can be viewed directly from the series Emergency Lamp With 555 follows.

Working frequency range of 555 Emergency Lamp With this set of configurations R1, R2 and C2. T1 in series Emergency Lamp With 10V 500mA 555 is a transformer. Secondary part (0-10V) is connected to the Q1 to be given the signal from the multivibrator. Then the primary (0-220V) is connected to the lamp.
Alkaline battery charger
Alkaline Battery Charger series is special used for alkaline battery charger. Alkaline Battery Charger With this series of alkaline batteries that have been drop (1.3 V) to the Rev back to 1.6 V. LEDs on the circuit this Alkaline Battery Charger will flash during charging process, and will be extinguished when the battery is full. The series also features Alkaline Battery Charger for 9V battery charger. VR 47 Ohm serves to regulate the battery charging current.

Alkaline Battery Charger series on utilizing each side beat AC signal from travo to perform the charging process, which is controlled using a 4 pieces set as the rectifier diodes. In mencharger battere with this series should often be controlled, because this circuit is not equipped with overcharge protection, especially for small-size battery.
Timer 555 Schematic
Simple Timer With 555 is one example of a simple timer and can be applied to electronic equipment. With 555 Timer Simple series takes advantage of the mode of the IC monostable multivibrator 555. With the relay output control circuit can be used to control equipment with AC voltage source. With 555 Timer Simple circuit can work with source voltage of 5 - 12VDC depending on the relay used. In order to use Simple Timer With this 555 can be started by pressing the switch S1 to start the process of timing. In the relay there are 2 options that is normaly Close connection (NC) and normaly open (NO).

The duration of the timing circuit 555 Simple Timer With RC configuration is determined by the VR 1 MOhm and C 10uF. Active timer duration can be calculated with the formula T = 1.1 RC where T (seconds), R (Ohm) and C (farad). To get more accurate results R and C components referred to in the formula should use good quality components, namely C of tantalum material and R with the quality of 1%.
Radio Frequency Generator Schematic
Radio Frequency Generator (RFG) is a tool used to generate the RF frequency. In the experimental modulation technique Radio Frequency Generator (RFG) is used as a carrier signal generator (carrier). The series of Radio Frequency Generator (RFG) can generate frequencies from 150KHz - 12 MHz. The series of Radio Frequency Generator (RFG) has been equipped generator modulation signal (information signal) that can be used to adjust the position of switch SW2. The series of Radio Frequency Generator (RFG) is also equipped with output level control via potensio VR1 and the output impedance selector selector with SW1. The series of Radio Frequency Generator (RFG) is also equipped with selector selector frequency band consisting of 5 range. For more details can be seen from the picture series of Radio Frequency Generator (RFG) follows.

The series of Radio Frequency Generator (RFG) above has 5 frequency range 150 KHz - 500 KHz, 350 KHz - 1 MHz, 750 KHz - 2.25 MHz, 1.6 MHz - 5 MHz and 3.5 MHz - 12 MHz. Selection of frequency range tersbut done by adjusting the position of selector switch SW3. To adjust the working frequency Radio Frequency Generator (RFG) is done by adjusting the lever variable capacitor (Varco), C1 and C2 are connected parallel.
10A High Current variable power supply
Power supply has 10A maximum current and output voltage can be set from 2 - 36VDC. Power supply circuit is quite simple, which is composed of the rectifier, voltage regulator and power regulator. Power regulator circuit High Current Variable Power Supply 10A uses the Q3 and Q4 are arranged Darlington and serves as a power regulator drivers Q5 and Q6. While the voltage regulator circuit is VR1 which serves as a variable voltage divider and Q1 and Q2 are arranged as a controller driver Darlington power regulator with variable reference voltage divider VR1.

In a series of High Current Variable Power Supply 10A 10A above have been completed as a current-limiting fuse. and to monitor the current flowing with ampere meter and volt meter to monitor the output voltage of the circuit.
Simple Power Supply with 2 transistors
Power Supply in this post is using a regulator which is composed of 2 pieces of NPN transistor. A transistor acts as a power regulator and a transistor again serves as a controller output voltage. Power Supply has an adjustable output with a range of 6-12 VDC. The part that serves as a power regulator is Q1 TIP31. Then the controller output voltage is a voltage divider composed of R3, R4, VR1 and R2 provide bias to the base of Q2 to control the power regulator Q1. In a series of power supply is mounted 5.1 V zener diode which serves to make the minimum limit the output voltage with Q2.

Power Supply With transistor circuit is quite simple and can be made with the PCB holes, so for those who want to try to directly mempraktikannya. May the power supply circuit can be useful for readers, especially for friends who need a power supply circuit with the regulator transistor.
Magnetic Switch Circuit
Magnetic switch is a circuit which can respond to magnetic fields that were around the sensor. The series of magnetic switches uses sensors in the form of limit switches that provide an additional metal plate that can respond to a magnet. Magnetic switch circuit is made with an NE555 monostable multivibrator and a flip-flop togle from IC CD4013. The series of magnetic switches uses 12VDC supply voltage and the magnetic circuit is mounted indicator switch which serves to give a signal when the sensors respond to magnetic fields using the LED D1. Here is a complete range of magnetic switches.


If the limit switches (sensors), active (connected) then it will get multivibrator NE555 triger signal and provides output pulses to be used to provide input signals to the flip-flop togle Relay K1 and active. Then when the sensors (limit switches respond to the magnetic field again, the multivibrator will give togle pulse as input to the flip-flop relay K1 and non-active.
Subscribe to:
Posts (Atom)